
WELCOME TO THE INSTALLATION GUIDE!
*** BEFORE YOU BEGIN ***
Determine which version of Lightroom you are using.
Click here for instructions on how to find out which version of Lightroom (or ACR) you are using.
All our preset collections are compatible with the NEWEST current subscription versions of the Adobe Lightroom Classic, Adobe Lightroom CC, and Adobe Photoshop/Camera Raw (ACR) apps.
All of our preset collections are also compatible with the current version of the Lightroom Mobile App, but MUST be installed in the subscription desktop version of Lightroom CC in order to sync to the mobile LR app. Watch a tutorial on that right here.
Please ensure your Adobe apps are up to date prior to purchasing, and you can always contact us at support to assist you in verifying compatibility.
PLEASE BE SURE TO CREATE A BACKUP COPY OF YOUR PRESETS PRIOR TO INSTALLING THEM.
PLEASE BE SURE TO CREATE A BACKUP COPY OF YOUR PRESETS PRIOR TO INSTALLING THEM.
ADOBE LIGHTROOM
INSTALLATION METHOD

With the Creative Cloud Photography plan from Adobe (including Lightroom CC, Lightroom Classic CC, & Photoshop) you can now easily import presets or profiles.
1. Navigate to the Develop module in the Lightroom app.
2. In the Presets panel, click the plus (+) icon at the upper-right corner and choose ‘Import Presets’ from the menu. PLEASE NOTE, you will only be able to click the plus (+) icon if you have images loaded in the Develop module.
3. In the import dialog that appears, select the downloaded ZIP file. Please note, this needs to be the original ZIP file. Some browsers will automatically uncompress this ZIP file, but it needs to be a ZIP to install correctly. If your browser has extracted the folder automatically from the zip (Safari on Mac does this), you may need to right-click and recompress it into a ZIP, or download the file with a different browser.
That’s it! Once you have added the ZIP file, it will automatically extract the presets into the Develop module for you. They will also now be available in Photoshop ACR if you want to use your presets & profiles there.
WATCH THIS installation TUTORIAL:
ACR (Adobe camera raw) for photoshop
installation method
Please note, if you install the presets/profiles in Lightroom, they will automatically be installed for ACR as well.
Otherwise, follow these steps to install for ACR only:
Open ACR (Adobe Camera Raw) in Photoshop (you can select a raw file to import to prompt it to open).
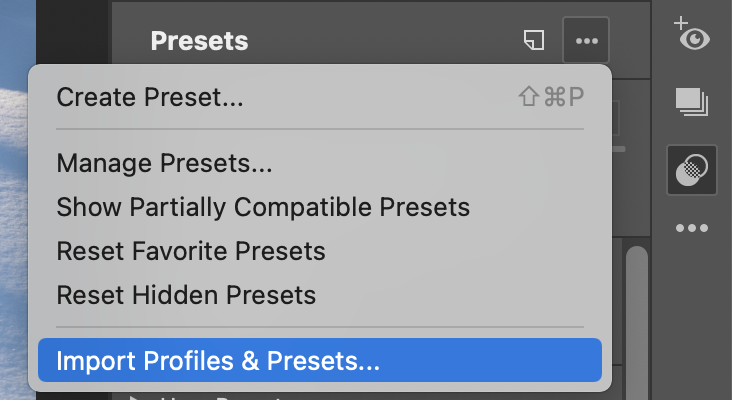
Select the 'Presets’ editing panel (shortcut is Shift+P).
Select the ‘…’ in the top right corner of the Presets panel to open more options.
Select ‘Import Profiles & Presets’, and choose the ZIP file of the presets you wish to import.
As in Lightroom, you must then select the downloaded ZIP file of the presets you wish to import. Please note, this needs to be the original ZIP file. Some browsers will automatically uncompress this ZIP file, but it needs to be a ZIP to install correctly. If your browser has extracted the folder automatically from the zip (Safari on Mac does this), you may need to right-click and recompress it into a ZIP, or download the file with a different browser.
That’s it! Your new presets are ready to use in ACR!
INSTALLING ARCHIPELAGO PHOTOSHOP ACTIONS
Download Archipelago actions, and unzip the ZIP file.
To install in Adobe Photoshop, start with a file already open in Photoshop, then load the actions in the action window settings (Window>Actions>Settings Icon>Load Actions).
OR on Mac, click and drag the .atn file onto the PS icon.
Watch this quick tutorial to guide you through this process:
If you are having any issues with completing your installation, don’t hesitate to reach out to us at support!